
Intro to INTELITY GEMS® for Hotel Staff
As a staff member who will be processing guest requests, you will need to have access to
GEMS. This tutorial assumes someone from your management team has already created an
account for you.
To login to GEMS, please navigate to the following URL – https://dashboard.keyprprod.com.
When the “Sign In” screens appears, enter the email address and password you used when the
account was activated. If you were provided a username, a password and an account code,
enter that information and then select “Sign In”.

After signing in, you will see a screen similar to the one below.

The sidebar on the left is collapsed by default, however, you can expand the sidebar by selecting the “>>” option in the bottom left corner of the screen, as depicted in this screenshot.

After expanding the sidebar, you will see a screen similar to the one below. To collapse the sidebar, simply select “Collapse Sidebar” in the bottom left corner of the screen.

It is up to you which view you prefer.
Requests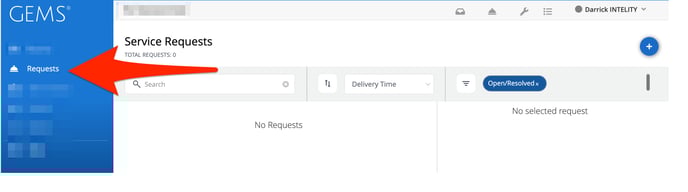
Typically, your primary duty in GEMS will be to process guest requests. With that being said, all guest-initiated requests submitted from an In-Room tablet or the hotel’s mobile app will display in the “Requests” section.

In addition to the number badge, your staff will also hear an audible alert every 20 to 30 seconds until the pending request has been acknowledged.

To acknowledge the request, simply select the “Acknowledge” option as depicted below.

After selecting the “Acknowledge” option, the button will then display the word “Assign”. Select the “Assign” option to assign a specific staff member to process the request.

Click on the “Assign To” field depicted below to see a list of staff members to select from.

Select your name or the name of the person to whom the request will be assigned then select “Submit”.

On the right side of the screen, the request will have an “Assigned” status as well as show to whom the request has been assigned. Other particulars are displayed therein such as
- Room Number
- Guest’s Last Name
- Type of Request
- Reported issue/Submitted Request
- Due Date & Time
.png?width=468&height=428&name=image47%20(1).png)
As you can see in the above screenshot, the guest in room 434 is reporting the A/C is not working. If you’re a member of the Engineering/Maintenance team and you’ve selected yourself to process the above request, then you would go to room 434 and take care of the problem. Afterwards, you would select “Resolve”.

If you found other issues or discovered that you needed specific parts to fix the problem, you could input that information in the “Comments” section and then select “Send”.

The history section will display the details from the time the request was created until the time it was closed.

Selecting the “Edit” option allows your staff to edit the request. When the editing is complete, select “Update” at the bottom of the screen as depicted in the following screenshot.


The “More” option allows you to print to a configured printer as well as link or associate the request to a work order.


Work Orders
Work orders are primarily for staff-based assignments and are typically not associated with guest requests. However, as you saw above, you can link a guest request to a work order, if necessary.
NOTE: Ticketing solutions like HotSOS, ALICE and KnowCross have a similar service. If your hotel is already using a ticketing system in this manner, please skip to the GUESTS section.
With that being said, submitting a work order is simple and straightforward. Select the “+” sign in the upper right corner to get started.

After selecting the “+” sign, you should see the following screen.

If you begin inputting a room number, you’ll notice the room number will start auto-populating as depicted below. If you’ll be inputting a location that is not a guest room, simply input the name. For example: Fitness Center.

.png?width=403&height=513&name=image23%20(1).png)
By the way, you can input more than one location. To do so, simply hit the enter/return key on your keyboard after inputting each location.

Next, select the priority: Normal, High or Immediate.

Select the Department. Typically, you will either select Housekeeping or Maintenance, however, you can also select both by selecting “All”. Note: INTELITY can create additional departments to add to the list, if necessary.

Selecting “Type” will reveal a long list of categories to choose from and the list is in alphabetical order.

Each category contains an “Other” in case what you’re seeking is not listed. For example, if you were reporting a broken window, you would scroll down to the W’s to locate the Windows section. Since there isn’t a category for a broken window, you would select “Windows – Other”.

After making your selection, you can input a Summary and then be as descriptive as necessary. You can even input special instructions.

From there you can input a due date and time, if desired. Simply select the section containing the date and time to reveal the calendar in month view and then select the preferred due date.

To enter a due time, select the little clock icon and then use the arrows to enter the specific time.


To change from AM to PM, simply click the Up or Down arrows for the hour until it shows the appropriate option.
After selecting the time, click on the “Submit” button to submit the Work Order. A summary of the work order will appear on the screen like the one depicted below.

Select the “Back to Work Orders” option at the bottom of the screen to see the pending work order(s). You will notice that the layout is almost identical to a submitted guest request.

The difference, however, is a “Start” button is displayed after acknowledging and assigning the work order to a staff member.

With guest requests, your staff is expected to start processing them immediately. However, a work order is a duty-based task/chore that’s mostly unrelated to guest requests. After the assigned staff person selects the “Start” option, the status of the Work Order will change to “In Progress”.


As with submitted guest requests, staff members can see whom the work order has been assigned, its description, summary and any additional details or specials instructions that may be included. Comments can also be added, and these comments will not be sent to guest devices. There is also a history of the work order starting with its creation all the way to its conclusion. Note: A work order can also be re-opened and reassigned. The history section will show all the aforementioned activity. Finally, you can insert links, if necessary.

Guests
The Guests section displays information that was synced to GEMS by the property management system (PMS) and includes the following:

- Due In – Hotel/resort guests that have a due-in status
- Checked In (Today) – Hotel/resort guests that have checked in to the hotel/resort today.
- In-House – All checked-in hotel/resort guests
- Due Out – Hotel/resort guests that are due to check out of the hotel/resort.
- Checked Out (Today) – Hotel/resort guests that have checked out of the hotel/resort today.
- Depending on your PMS and whether or not it is activated on INTELITY’s side, you may see the “Pre Arrival” section as depicted in the next screenshot.
Note: Your Front Desk staff will continue using the hotel’s property management system for its day-to-day tasks, however, if your hotel does not have a 3rd party PMS and will be solely dependent on GEMS then you will see an option to create new reservations.

When the “Create New Reservation” option is selected, your staff will be able to select either “Reserve” or “Check In”. Additionally, they’ll be able to input the guest information before selecting “Submit” to create the reservation, as depicted below.

Selecting “Reserve” will cause the reservation to be visible in the “Due In” section. Whereas selecting “Check In” will cause the reservation to be displayed in both the “Checked In (Today)” and “In-House” sections.

Clicking on the green “edit” option will allow your staff to edit the phone number and email address for the guest.

Notice the down arrow to the right of each listed guest’s name. Selecting it will reveal the Confirmation Number, External ID and the assigned Room Number as depicted in the following screenshot.

If you subscribe to INTELITY’s Guest Messaging feature, you will see a phone number at the top of the screen next to “Today’s Guests” if the feature has been activated by INTELITY. That phone number is used for the purpose of sending and receiving SMS text message to and from hotel guests. With that being said, it is up to the hotel to promote that phone number to its guests but know it will always be visible to your staff at the top of the Guests section of GEMS.
Underneath the phone number is a search field that will allow staff members to search for a specific guest name or room number. The “Reset” button on the right side of the screen will simply remove the searched information from the search field.

In front of each listed guest’s name should be a chat icon like the ones depicted in the following screenshot and it will either be gray or blue in color.

A gray chat icon means there isn’t a phone number detected for that guest in GEMS and thus your staff will be unable to send an SMS message to that guest. However, if the chat icon is blue then your staff will be able communicate with the guest using INTELITY’s Guest messaging feature.
To send a chat message to a guest, click on the blue chat icon in front of his or her name to bring up the chat window. Enter the message you’d like to send to the guest in the area where is states, “Type your message…” and then select “Send” to send it. The gray section at the top is where the message thread will be displayed. In other words, the entire SMS communication between your staff and the guest will be visible there.
Note: For privacy reasons, The INTELITY Guest Messaging feature does not support texting more than one guest at a time.

If you are subscribed to INTELITY’s mobile check-in feature, you will see a blue box with the word “Invite” on it. The invite button will only appear when an email address is present in GEMS for the guest as depicted in the following screenshot.

Selecting the invite button will allow your staff to send an email like the one depicted below to your guest.

The email will be titled, “Manage Your Upcoming Stay” and will contain the following information:
- The hotel/resort logo
- Header image
- Requested verbiage
- Auto-generated code guests will need to be able to view their reservation within the mobile app
- Links to the associated App Stores to install the mobile app
- Social Networking links
- Hotel/Resort address/additional info
Note: The information in the above-mentioned email invite will provide guests with the means to install the hotel’s mobile app and be able to view his or her reservation therein as well as activate a digital key, if applicable.
When a guest successfully checks in to the hotel via the hotel’s mobile app, this is what front desk staff members will see in GEMS.![]()
If the mobile check-in had failed, this is what front desk staff members will see.
![]()
One of the main reasons for a failed mobile check-in is due to a guest trying to check-in without meeting a hotel requirement such as having a credit card on file.
Rooms
The Rooms section basically displays the room numbers, the guest who is registered in each room, his or her email address (if provided), the departure date and certain actions like room status (if activated).

If you have a mobile key integration with INTELITY then you will also see depictions of a digital key in front of each room number as depicted in the following screenshot.

The digital keys will primarily be black in color unless a guest activates the key via the hotel/resort’s mobile app. Activating the key allows the guest to unlock his or her room door or gain access to an allowed common area. An activated key will be green in color. If you see an orange key, then it will typically mean a key failed to activate.

Clicking on a black digital key will display the guest’s email address as well as a “Disable Key Activation” option. Selecting that option will prevent the guest from being able to activate a digital key via the mobile app.

If the key is green (Meaning a guest has already activated a digital key), you will see two options when clicking on the green key. -- “Revoke Key” and “Disable Key
Activation”. In addition, you will see the guest’s email address and the date and time the digital key was activated.

Selecting the “Revoke Key” option disables a digital key that has already been activated.
In the upper right corner of the Rooms screen, you will see a “Floor: All” option as depicted in the following screenshot.

Selecting that option will display a list of the hotel/resort floors, if applicable. Simply select the floor or floors you want to display and then select “Apply”. The Rooms section will adjust accordingly.

If you select a single floor (Floor 3, for example), the “Floor: All” option will display as “Floor: 3”. If you select more than one floor, it will display as “Floor: Multiple”.
![]()
